CLICK HERE FOR FREE BLOGGER TEMPLATES, LINK BUTTONS AND MORE! »

Thursday, June 28, 2012

Star-Spangled Wreath


A simple dress up for the front door that started its life as your run-of-the-mill $2.99 craft store
grapevine wreath...


White-washed with watered-down acrylic paint and topped with a mesh bow (attached with a white pipe cleaner).  Then a smattering of stars:


just unfinished wooden cut-outs from
 Hobby Lobby with patriotic scrapbook paper mod-podged on, then detailed with dark brown ink "distressing."


I wanted to add bigger stars, but unfortunately they were school bus yellow!!!


Of course a little craft paint took care of that.  In case you're wondering, yes, that is a plasic jar lid (Kraft parmesan cheese)
the star is resting on to dry.  Push pins work marevelously as little "feet" inserted before painting so that the object doesn't stick to a surface as it drys...but for such a thin cutout, better to use a little riser like the lid.


The hinged top makes a nice "easel"  when needed, too.


A little detailing was added to the big stars with a white paint pen.  Then, it was a matter of just putting it all together with some hot glue and adding a jute hanger.  There you have it!

Have a star-spangled holiday!

Wednesday, June 27, 2012

Fourth of July, Lousiana style

Gotta have red, white and blue for the Fourth, right?
Well, in Cajun country "red" means red beans and then of course "white" has to be rice! So, here's a sweet and simple homespun
Independence Day centerpiece...
A cylinder vase layered with beans and rice then topped with a candle and dressed up with a bow fashioned from a strip of star-spangled fabric.  Then a trio of star-shaped cookie cutters
for good measure!

Sunday, June 10, 2012

Bath Update

Well, yes, of course you're right; most people don't put a reading nook in the bathroom...but my master bath isn't just my bathroom, it's my refuge.  For me, cottage-y comfort paired with a place to enjoy a book is the recipe for relaxation.  So-o-o a big cushy chair and its ottoman snuggle up to the bath tub and help make the room a place I look forward to enjoying daily. 

I have had a problem area in there, though.


Over the last five years a variety of pretty framed prints, endearing knick knacks and home decor flotsam and jetsom have been displayed on a pair of shelves above the towel rack next to the twin sinks.  Recently, the sad little shelves have showcased nothing at all (except a bit of dust, I fear).
Then yesterday, I made a quick trip Hobby Lobby to get paint for some commissioned art and stumbled upon a really cute frame.

Do I even need to mention that it was on sale?  Half price.  So, of course I bought two.
The photo isn't clear enough to show that the designer had coupled the sweet metal frame with a big faux jewel in the middle of the bow.  Now, I am certainly not going to dispute the fact that diamonds are a girl's best friend, but I wasn't completely won over by this big plastic one.  Bling is wonderful--I have a couple of dear friends who have glitter in their veins--but it's just not, well, "me."  So while in HL I unearthed some things to use to make some cottage chic modifications:
Okay, okay, I could have gotten an 1/8 a yard of burlap for a fraction of what I paid for the two premade flowers and created my own, but I had a busy enough day before I encountered this serendipity of a project; so I decided to take the easy route.  I thought the buttons were a good match for the fabric of my chair.  And oh, I already had the jute on hand in my studio.
The only problem with a really cutie patootie frame is that it needs something cutie patootie inside it. And this was an impulse project, so I had nothing! I decided I wanted to play with the colors in my chair's vintage upholstery, so I grabbed one of the arm protectors.

And I scanned it.  Yep, I scanned the fabric and then printed the photo onto cardstock that I could use as the backdrop for--well, something.  Happily, while I was in the study scanning the fabric my eye ventured upon an old tattered black and white photo of my hubby as a baby. It was sitting atop his bookcase where he'd left it during a recent discussion of how much our grandson Tyson looks like him that old snapshot. I decided I could frame it and slip an old black and white picture of me as a little girl into the other frame...just right for the room we share.

And there we have it! What do you think?

Sunday, June 3, 2012

Let your light shine...

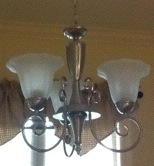
I almost had the light fixture I wanted.  Almost. 

I liked the finish, a warm brushed nickel that suited me perfectly; it nicely echoed the finish of the other hardware in my cottage-y kitchen.  The scale was right.  The price had been happily budget-friendly.  But the glass shades were just not quite...quite.
Still, I talked myself into the purchase, thinking the shades would grow on me.  They didn't.  I lived with those shades for over a year.  But, finally, the DIY-er in me just couldn't stand it any more, and it was time to revamp.

What I really wanted were cute little fabric shades. 
And, these were perfect.  Almost.  I found them at Lowe's, in a slubby not-too-formal fabric that was a good neutral color match for the kitchen.  But they were a smidge too short, exposing the place where the bulbs screw into the base.  So it was time for a little embellishment.


I have learned that there is very little that a hot glue gun and imagination cannot fix.  I found homey cotton weave for banding, and paired it with crisply folded ruffles.  Together, they were just enough to sweeten the shades--and cover the hardware.


And what about covered buttons that are a match made in heaven?


And, finally, just the perfect combo.


Me and my bright ideas.

Have a blessed day, y'all!